Интеграция ИБП CyberPower в Home Assistant

В данной статье я расскажу как добавить мониторинг ИБП в Home Assistant на примере CyberPower Value500EI.
У данной модели есть USB разъем для мониторинга состояния ИБП. Для мониторинга у CyberPower есть своя утилита под названием PowerPanel. Скачать ее можно с сайта производителя. У меня на домашнем сервере стоит Ubuntu 20.04, по этому я скачал PowerPanel for Linux 64bit (deb).
Подключаем ИБП через USB и устанавливаем PowerPanel:
dpkg -i CyberPower_PPL_Linux+64bit+\(deb\)_v1.4.1.deb
После установки проверяем командой:
pwrstat -statusВ ответ, если все нормально, должны увидеть примерно следующее:
    The UPS information shows as following:

    Properties:
            Model Name................... Value500EI
            Firmware Number.............. BZAB100.B31
            Rating Voltage............... 230 V
            Rating Power................. 275 Watt(500 VA)

    Current UPS status:
            State........................ Normal
            Power Supply by.............. Utility Power
            Utility Voltage.............. 224 V
            Output Voltage............... 226 V
            Battery Capacity............. 100 %
            Remaining Runtime............ 31 min.
            Load......................... 49 Watt(18 %)
            Line Interaction............. None
            Test Result.................. Unknown
            Last Power Event............. Blackout at 2022/09/13 23:53:27 for 7 sec.
В файле /etc/pwrstatd.conf настраиваем выключение компьютера через время после перехода на резервное питание или при разряде аккумулятора на определенный процент. Также можно настроить отправку E-Mail или выполнение произвольного скрипта. После изменения перезапускаем демона:
service pwrstatd restartУ меня настроено выключение сервера при разряде аккумулятора до 35%. Мой конфиг:
# pwrstatd configuration file
#

# You must restart pwrstatd after changing this file in order for changes to take effect.
# Ex:/etc/init.d/pwrstatd restart

#
# Action setting for event of Power Failure
#

# A delay time in seconds since event of Power Failure occur then to run shell
# script and shutdown system. Allowed range is 0 ~ 3600. Default is 60 sec.
powerfail-delay = 60

# Enable to run shell script when the event of Power Failure occur.
# The allowed options are yes and no. Default is yes.
powerfail-active = yes

# Assign a path of script file for event of Power Failure.
# The default is /etc/pwrstatd-powerfail.sh
powerfail-cmd-path = /etc/pwrstatd-powerfail.sh

# How much time in seconds to take script running for event of Power Failure.
# The allowed range is 0 ~ 3600. Default is 0 sec.
powerfail-duration = 0

# Allow Daemon to shutdown system for event of Power Failure.
# The allowed options are yes and no. Default is yes.
powerfail-shutdown = no

#
# Action setting for event of Battery Low
#

# A threshold of Battery Capacity, If the battery capacity is lower than this
# value and a event of Battery Low will be identified. The unit is percentage.
# The allowed range is 0 ~ 90. Default is 35 %.
lowbatt-threshold = 35

# A threshold of Remaining Runtime, If the Remaining Runtime is lower than this
# value and a event of Battery Low will be identified. The unit is second.
# The allowed range is 0 ~ 3600. Default is 300 sec.
# Note: When meet this condition the below 'shutdown-sustain' property
# will be ignored.
runtime-threshold = 300

# Enable to run shell script when the event of Battery Low occur.
# The allowed options are yes and no. Default is yes.
lowbatt-active = yes

# Assign a path of script file for event of Battery Low.
# The default is /etc/pwrstatd-lowbatt.sh
lowbatt-cmd-path = /etc/pwrstatd-lowbatt.sh

# How much time in seconds to take script running for event of Battery Low.
# The allowed range is 0 ~ 60. Default is 0 sec.
lowbatt-duration = 0

# Allow Daemon to shutdown system for event of Battery Low.
# The allowed options are yes and no. Default is yes.
lowbatt-shutdown = yes

# Turn UPS alarm on or off.
# The allowed options are yes and no. Default is yes.
enable-alarm = yes

# The necessary time in seconds for system shutdown.
# The UPS will turn power off when this time is expired.
# The allowed range is 0 ~ 3600. Default is 600 sec.(10 min.)
# If the computer shutdown is cause by low runtime condition, the UPS will
# turn power off when the time is expired that time is assigned on
# 'runtime-threshold' property and it is no longer to refer the
# 'shutdown-sustain' property.

shutdown-sustain = 600

# Daemon will turn UPS power off once it ask system shutdown cause by a power
# event. Allowed options are yes and no. Default is yes.
turn-ups-off = yes

# The period of polling UPS in seconds.
# The allowed range is 1 ~ 60. Default is 3 sec.
ups-polling-rate = 3

# the period of re-try to find available UPS in seconds since find nothing at
# last time. The allowed range is 1 ~ 300. Default is 10 sec.
ups-retry-rate = 10

# Prohibiting daemon to provide communication mechanism for client, such as
# pwrstat command. normally, it should be 'no'. It can be 'yes' if any security
# consideration. Allowed options are yes and no. Default is no.
prohibit-client-access = no
# The pwrstatd accepts four types of device node which includes the 'ttyS',
# 'ttyUSB', 'hiddev', and 'libusb' for communication with UPS. The pwrstatd
# defaults to enumerate all acceptable device nodes and pick up to use an
# available device node automatically. But this may cause a disturbance to the
# device node which is occupied by other software. Therefore, you can restrict
# this enumerate behave by using allowed-device-nodes option. You can assign
# the single device node path or multiple device node paths divided by a
# semicolon at this option. All groups of 'ttyS', 'ttyUSB', 'hiddev', or
# 'libusb' device node are enumerated without a suffix number assignment.
# Note, the 'libusb' does not support suffix number only.
#
# For example: restrict to use ttyS1, ttyS2 and hiddev1 device nodes at /dev
# path only.
# allowed-device-nodes = /dev/ttyS1;/dev/ttyS2;/dev/hiddev1
#
# For example: restrict to use ttyS and ttyUSB two groups of device node at
# /dev,/dev/usb, and /dev/usb/hid paths(includes ttyS0 to ttySN and ttyUSB0 to
# ttyUSBN, N is number).
# allowed-device-nodes = ttyS;ttyUSB
#
# For example: restrict to use hiddev group of device node at /dev,/dev/usb,
# and /dev/usb/hid paths(includes hiddev0 to hiddevN, N is number).
# allowed-device-nodes = hiddev
#
# For example: restrict to use libusb device.
# allowed-device-nodes = libusb
allowed-device-nodes =

# Daemon will hibernate system to instead of system shutdown when power
# event occur. Allowed options are yes and no. Default is no.
hibernate = no

# Enable cloud solution.
# The allowed options are yes and no. Default is no.
cloud-active = no

# Account for cloud server login.
cloud-account =
Далее в Docker необходимо установить контейнер, который будет парсить эту информацию и передавать в MQTT брокер:
docker pull dwinks/pwrstat_docker
docker volume create pwrstat_data
docker run -d -p 5003:5003 --name=pwrstat --restart=always -v /var/run/docker.sock:/var/run/docker.sock -v pwrstat_data:/data dwinks/pwrstat_docker
После запуска контейнера смотрим его ID из списка:
docker ps -a

Переходим в консоль контейнера:
docker exec -it a86d79a48027 bashВ контейнере нам нужно для удобства установить nano и отредактировать конфиг. Для это выполняем:
apt update
apt install nano -y
nano /pwrstat.yaml
В конфиге указываем IP адрес и порт MQTT брокера, частота обновления, имя и пароль MQTT.
pwrstat_api: # optional
  log_level: WARNING # optional
mqtt:
  broker: "192.168.0.24"
  port: 1883
  client_id: "pwrstat_mqtt"
  topic: "sensors/basement/power/ups"
  refresh: 5
  qos: 0
  retained: true
  username: "*****" # optional
  password: "*****" # optional, required if username specified
rest:
  port: 5003
  bind_address: "0.0.0.0"
prometheus:
  port: 9222
  bind_address: "0.0.0.0"
  labels:
    rack: "0"
Перезапускаем контейнер:
docker restart pwrstatПроверяем работоспособность по ссылкам: http://192.168.0.24:5003/health и http://192.168.0.24:5003/mqtthealth. Не забудьте поменять IP на свой. Если все нормально, то мы увидим:
{"code":"SUCCESS","message":"OK"}Отлично! Данные отправляются в MQTT. Теперь необходимо достать их в Home Assistant. Для этого создаем сенсоры:
mqtt:
sensor:
# UPS Sensors
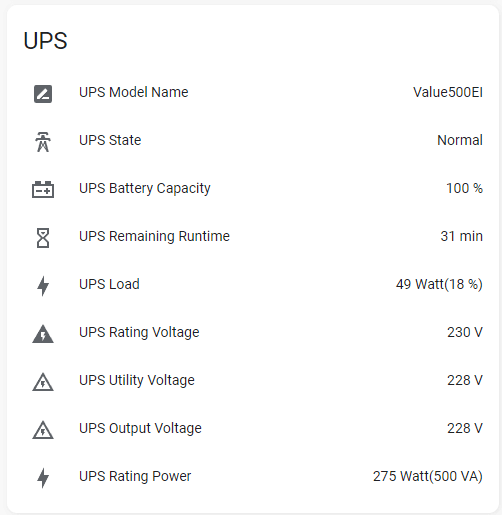
- name: "UPS Model Name"
icon: mdi:rename-box
state_topic: "sensors/basement/power/ups"
value_template: "{{ value_json['Model Name'] }}"
- name: "UPS Rating Voltage"
icon: mdi:flash-triangle
state_topic: "sensors/basement/power/ups"
value_template: "{{ value_json['Rating Voltage'] }}"
- name: "UPS Rating Power"
icon: mdi:lightning-bolt
state_topic: "sensors/basement/power/ups"
value_template: "{{ value_json['Rating Power'] }}"
- name: "UPS State"
icon: mdi:transmission-tower
state_topic: "sensors/basement/power/ups"
value_template: "{{ value_json['State'] }}"
- name: "UPS Power Supply by"
icon: mdi:power-socket-eu
state_topic: "sensors/basement/power/ups"
value_template: "{{ value_json['Power Supply by'] }}"
- name: "UPS Utility Voltage"
icon: mdi:flash-triangle-outline
state_topic: "sensors/basement/power/ups"
value_template: "{{ value_json['Utility Voltage'] }}"
- name: "UPS Output Voltage"
icon: mdi:flash-triangle-outline
state_topic: "sensors/basement/power/ups"
value_template: "{{ value_json['Output Voltage'] }}"
- name: "UPS Battery Capacity"
icon: mdi:car-battery
state_topic: "sensors/basement/power/ups"
value_template: "{{ value_json['Battery Capacity'] }}"
- name: "UPS Remaining Runtime"
icon: mdi:timer-sand
state_topic: "sensors/basement/power/ups"
value_template: "{{ value_json['Remaining Runtime'] }}"
- name: "UPS Load"
icon: mdi:lightning-bolt
state_topic: "sensors/basement/power/ups"
value_template: "{{ value_json['Load'] }}"
- name: "UPS Line Interaction"
state_topic: "sensors/basement/power/ups"
value_template: "{{ value_json['Line Interaction'] }}"
- name: "UPS Test Result"
state_topic: "sensors/basement/power/ups"
value_template: "{{ value_json['Test Result'] }}"
- name: "UPS Last Power Event"
state_topic: "sensors/basement/power/ups"
value_template: "{{ value_json['Last Power Event'] }}"
У меня это выглядит вот так:
Так же я настроил уведомления в Telegramm при отключении и включении электричества.
- alias: "Уведомления - Питание от ИБП"
  mode: single
  trigger:
    - platform: template
      value_template: "{{ states('sensor.ups_state') == 'Power Failure' }}"
  action:
    - service: notify.me
      data:
        message: "Внимание! Проблемы с питанием, переход на питание от аккумулятора."

- alias: "Уведомления - Питание от сети"
  mode: single
  trigger:
    - platform: template
      value_template: "{{ states('sensor.ups_state') == 'Normal' }}"
  action:
    - service: notify.me
      data:
        message: "Питание восстановлено"
На этом настройка завершена! Спасибо за внимание 🙂
8 thoughts on “Интеграция ИБП CyberPower в Home Assistant”
power panel уже встроена в контейнер, только там версия 1.3.3. В команду docker run нужно еще добавить доступ к usb (—device…) либо полный доступ —privileged, иначе контейнер не будет видеть usb с ups.
Спасибо за дополнение, не видел бесперебойник
Вдруг кому пригодится, завелось командой docker run -d -p 5003:5003 —name=pwrstat —restart=always -v /var/run/docker.sock:/var/run/docker.sock -v pwrstat_data:/data —privileged dwinks/pwrstat_docker
Добрый день, а если Home Assistant развернут на виртуалке? Какой порядок действиий?
Не совсем понял вашего вопроса.
dpkg -i CyberPower_PPL_Linux+64bit+\(deb\)_v1.4.1.deb
Команда не работает
Что пишет в ответ? Что за дистрибутив вы используете?
Возможна схема работы Proxmox + HomeAssistant OS
Когда у вас развернут HA в виртуалке и вы не хотите пробрасывать USB в HA для того чтобы сохранить возможность отключения по питанию сервера Proxmox, но и получить мониторинг UPS в HA потребуется развернуть Docker напрямую в Proxmox без CT контейнера.
-Важное условие установить/запустить docker контейнер в привилегированном режиме —privileged
docker run -d -p 5003:5003 —name=pwrstat —restart=always —privileged -v /var/run/docker.sock:/var/run/docker.sock -v pwrstat_data:/data dwinks/pwrstat_docker
По настройкам конфигураций всё тоже самое что в инструкции, IP адрес MQTT брокера указываете HA.
Спасибо автору статьи что помог настроить такую работу Proxmox + HomeAssistant OS
-Ещё важное условие, поставить задержку на запуск Docker иначе HA не успевает загружатся, а контейнер уже не сможет подключится к HA, нет функции реконекта. 240 секунд = 4 минуты вполне достаточно, а там смотрите по своему железу.
Создать каталог docker.service.d и файл override.conf таков путь: /etc/systemd/system/docker.service.d/override.conf
Отредактировать сервис докера
sudo systemctl edit docker.service или же sudo nano /etc/systemd/system/docker.service.d/override.conf и добавить только эти строки
[Service]
ExecStartPre=/bin/sleep 240
Выполнить команды
sudo systemctl daemon-reload
sudo systemctl restart docker.service
А к комменту забыл добавить что еще для контейнера нужно указать -e TZ=Europe/Moscow -v /etc/timezone:/etc/timezone:ro иначе будет время UTC а не локальное